Table of Contents
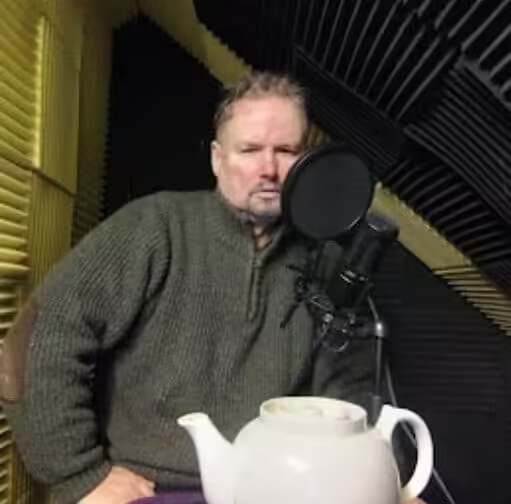
Eric’s voice-over studio is a triple wall air-gapped room in my loft that is 99% treated with acoustic tiles – walls and ceiling, and thick carpeting below. This greatly reduces reverberation and ensures clean, audio. I have a professional signal chain with a decent microphone, audio interface and Iindustry standard editing software.
Rode + id4 interface, linked to a silent NUK (Intel NUC10i7FNH 10th Gen). Pop filters etc. as required. Teapot an optional extra, thought is was a suitable English signifier.
During this labour I got a lot of inspiration from David Goldberg and Edge Studio. I watched a number of clips on there of people walking the same path. Every studio was different! For myself and my colleagues I took a minimalist approach with almost everything in there dedicated to sound proofing and reverberation reduction. Even after the reverb was sorted I was still getting interference from the outside so I built a third air-gapped wall which did the job!
Eric’s voice over studio sound profile.
Reverberation and sound floor is remarkable (< -65dB).
I was very pleased with the results and found myself doing collaborations with other people in my area who needed a quiet, reverb treated space too. Check out more VO chat on my blog on here and contribute if you like.
Information of Nerds – Voice Over Studio Acoustics, Reverb and Noise Floor
Many clients ask about microphones, interfaces and software, but one of the biggest factors affecting voice-over quality is actually the room itself, the voice over studio. A great microphone placed in a poor acoustic environment will often produce inferior results to a modest microphone used in a well-treated space.
One of the main challenges in voice recording is controlling reverb, sometimes referred to as room echo. When sound leaves the speaker’s mouth it travels directly to the microphone, but it also reflects from walls, ceilings, desks and other hard surfaces. These reflections arrive slightly later than the direct voice and can make recordings sound distant, hollow or “boxy”.
For my own voice over studio, my approach was to treat the room from wall to ceiling using acoustic tiles. In consultation with the excellent Edge Studio, I experimented with different approaches and observed that adding something large, soft and absorbent improved things further. Along the sloping inner wall I hung a folded throw. This was not an aesthetic decision but an important part of the overall acoustic treatment plan.
The objective is to reduce unwanted reflections while maintaining a natural-sounding voice.
In my own studio, I have gradually improved the acoustic treatment over time through testing, listening and making practical adjustments. Like many voice artists, I have found that incremental improvements often produce the best results. Small changes to microphone position, room treatment and recording technique can have a surprisingly large impact on the final recording.
Reverb can be measured objectively. One common metric is RT60, which represents the time taken for sound to decay by 60 decibels after the source has stopped. Professional studios often aim for very low RT60 values in voice recording environments. Various software tools can analyse room responses and estimate reverberation times, allowing engineers to compare acoustic performance before and after treatment.
Another important consideration is noise floor. Put simply, the noise floor is the level of background noise present in a recording when no one is speaking. This can include computer fans, electrical equipment, traffic, distant voices, heating systems or even the natural self-noise of recording equipment.
Professional voice over clients will often specify a maximum acceptable noise floor, commonly around -60 dB or lower. A lower figure generally indicates a cleaner recording with less unwanted background noise. This becomes particularly important for audiobooks, e-learning projects, AI training data and other forms of long-form narration where background noise can become distracting over time.
Noise floor can be measured by recording several seconds of silence and analysing the resulting waveform using audio software. Achieving a low noise floor in the voice over studio is usually the result of many small improvements rather than a single solution. Careful microphone placement, quality audio interfaces, acoustic treatment, quiet computer systems and good recording practices all contribute. Sometimes simply choosing a quieter time of day to record can make a noticeable difference.
Physical measures can make a significant difference. Heavy curtains, acoustic panels, draught exclusion around doors, carpets and soft furnishings can all help reduce unwanted noise. Even seemingly minor details such as turning off unnecessary electrical equipment, silencing mobile phones or reducing vibration from desks and microphone stands can contribute to a cleaner recording.
In the early days of my voice over studio I routed cables outside the treated space to keep computer noise away from the microphone. More recently I moved to a compact Intel NUC system, which is effectively silent during recording. Combined with a lightweight Ubuntu-based recording setup, this has helped create a quieter and more reliable working environment.
Measurements only tell part of the story. Ultimately, the most important test is whether the recording sounds clear, intelligible and natural to the listener. For voice-over work, the objective is not simply technical perfection but creating audio that is engaging, professional and easy to understand.
I tend to avoid manipulating background noise during post-processing, aiming instead for a naturally quiet recording environment wherever possible. This preserves the character and clarity of the voice without introducing digital artefacts that can occur when aggressive processing is applied. In professional audio, prevention is usually preferable to correction.
As with many aspects of audio production, there is often a balance between science and practical experience. Measurements provide useful data, but careful listening remains one of the most valuable tools available to any voice artist. Much of the work involved in maintaining a professional voice-over studio therefore happens before the Record button is ever pressed. Careful attention to room acoustics, background noise and recording technique helps ensure that clients receive clear, consistent and professional-quality audio.